
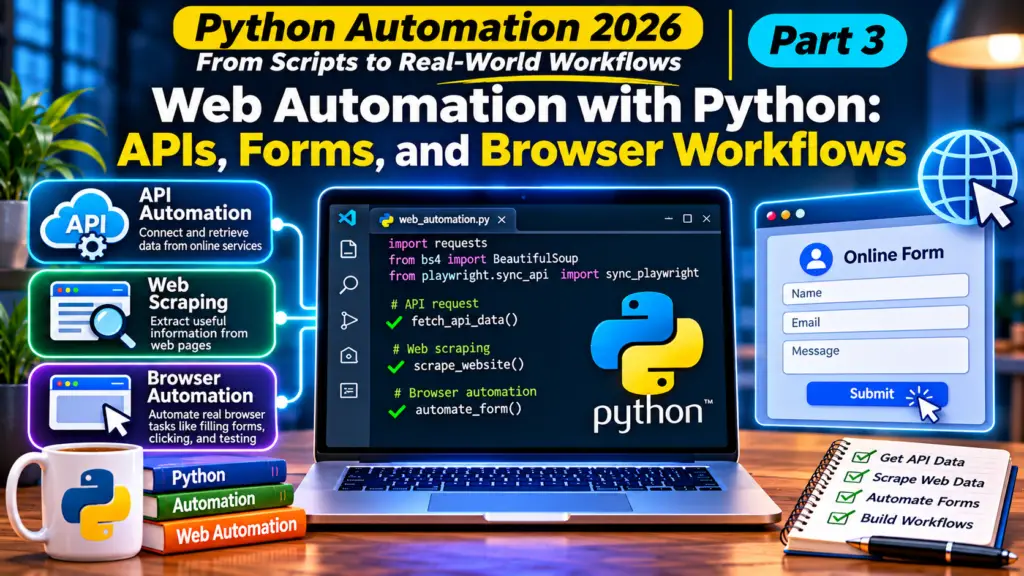
Part 3 of Python Automation 2026 — From Scripts to Intelligent Workflows
Imagine opening a website every morning, logging into an account, collecting information, copying data into a spreadsheet, submitting a form, and sending a report to your team.
Now imagine automating some of those activities with Python.
That is the idea behind web automation.
Web automation allows software to interact with online services and websites, reducing repetitive manual activities and helping businesses build more efficient workflows.
In Part 1, we introduced Python automation and built a simple file organizer. In Part 2, we explored file and folder automation, including batch renaming, archiving, and generating inventory reports.
In this article, we’ll take the next step and explore how Python can work with the web.
We’ll cover:
- How Python communicates with websites.
- What APIs are and how to use them.
- How to retrieve and process web data.
- How to interact with HTML forms.
- How browser automation works.
- How to build a practical web data collection project.
- Important security and ethical considerations.
By the end, you’ll understand the difference between API automation, web scraping, and browser automation, and when to use each approach.
1. What Is Web Automation?
Web automation is the use of software to perform tasks that would otherwise require a person to interact with a website or online service.
These tasks can include:
- Retrieving information from websites.
- Collecting data from online sources.
- Submitting web forms.
- Downloading reports.
- Checking website availability.
- Interacting with web applications.
- Updating information through online services.
- Generating reports from online data.
For example, imagine a business that receives customer enquiries through an online form.
Instead of manually copying every enquiry into a spreadsheet, a properly designed automation workflow could retrieve the submitted information through an API and save it into a database or report.
Another example is an IT professional who wants to check whether several company websites are responding correctly.
Python can periodically send requests to those websites and record their HTTP status codes.
The possibilities are extensive.
However, web automation is not one single technology. It involves several approaches, and choosing the correct one is important.
2. Three Important Approaches to Web Automation
Before writing code, let’s understand three common approaches.
A. API Automation
An API, or Application Programming Interface, allows different software applications to communicate with each other.
For example, an application might use an API to retrieve customer information, submit an order, or access payment information.
Instead of opening a website and clicking through several pages, Python can communicate directly with the service’s API.
A typical API workflow looks like this:
- Python sends a request to an API endpoint.
- The server processes the request.
- The server returns a response.
- Python processes the returned information.
- The script performs another operation using that information.
APIs commonly exchange data in JSON format.
Example:
{
    "id": 1,
    "title": "Learning Python",
    "completed": true
}
API automation is often the preferred approach when a supported API is available because it is generally more structured and reliable than interacting with a website’s visual interface.
B. Web Scraping
Web scraping involves extracting information from web pages.
For example, a Python script could retrieve publicly available article titles from a website and save them in a spreadsheet.
A web page usually contains HTML elements that describe its structure.
Python libraries such as BeautifulSoup can help locate and extract specific elements.
Web scraping is useful when the information is publicly available but an appropriate API is not provided.
However, you should always respect the website’s terms of service, access restrictions, copyright requirements, and applicable privacy laws.
C. Browser Automation
Browser automation involves controlling a web browser programmatically.
Instead of simply requesting information from a server, Python can automate browser actions such as:
- Opening a website.
- Clicking buttons.
- Filling out forms.
- Navigating between pages.
- Waiting for elements to load.
- Taking screenshots.
- Testing website functionality.
Tools such as Playwright and Selenium support browser automation.
This approach is particularly useful when a workflow depends on JavaScript, dynamic page content, or interactions that cannot conveniently be performed through an API.
Understanding the Differences
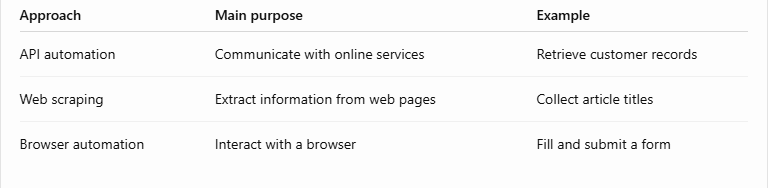
A useful rule is:
Use an API when one is available and suitable. Use web scraping for permitted information extraction. Use browser automation when actual browser interaction is necessary.
3. Setting Up Your Python Environment
For this article, we’ll use three popular Python packages:
requests— sending HTTP requests.beautifulsoup4— parsing HTML content.playwright— automating browser interactions.
First, create a project directory:
python-web-automation/
│
├── main.py
├── requirements.txt
└── README.md
Open your terminal and create a virtual environment.
On Windows:
python -m venv venv
venv\Scripts\activate
On macOS or Linux:
python3 -m venv venv
source venv/bin/activate
Install the required packages:
pip install requests beautifulsoup4 playwrightInstall the Playwright browser:
playwright install chromiumCreate a requirements.txt file:
requests
beautifulsoup4
playwright
You now have the basic environment for the examples in this article.
4. Making HTTP Requests with Python
HTTP stands for Hypertext Transfer Protocol. It is the communication protocol commonly used when browsers and applications communicate with web servers.
Python’s requests library makes it easy to send HTTP requests.
Let’s start with a simple example.
import requests

url = "https://jsonplaceholder.typicode.com/posts/1"

response = requests.get(url, timeout=15)

print("Status Code:", response.status_code)
print(response.json())
This example sends a GET request to a public test API.
The API returns a sample post in JSON format.
The response includes a status code.
Some common HTTP status codes include:
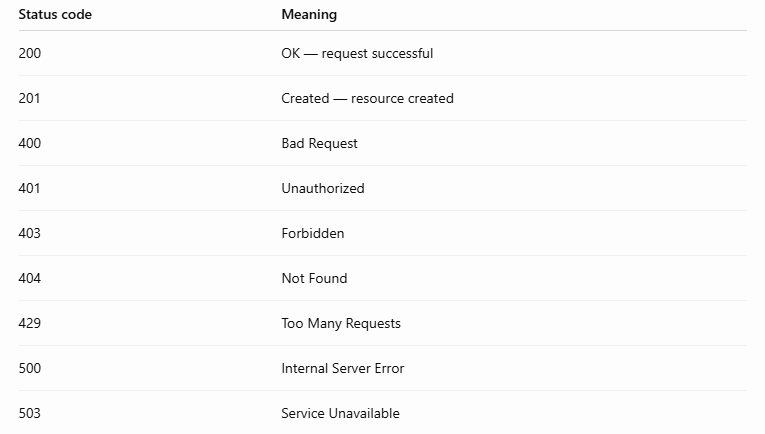
Understanding HTTP status codes helps you identify whether a web request succeeded or encountered a problem.
Handling Errors Properly
A production automation script should not assume every request will succeed.
The server might be unavailable, the internet connection might fail, or the API might return an error.
A better example is:
import requests

url = "https://jsonplaceholder.typicode.com/posts/1"

try:
    response = requests.get(url, timeout=15)

    response.raise_for_status()

    data = response.json()

    print("Title:", data["title"])
    print("Body:", data["body"])

except requests.exceptions.Timeout:
    print("The request timed out.")

except requests.exceptions.HTTPError as error:
    print("HTTP error:", error)

except requests.exceptions.RequestException as error:
    print("Request failed:", error)

except ValueError:
    print("The server returned invalid JSON.")
Here, raise_for_status() raises an exception when the server returns an unsuccessful HTTP status code.
The script then handles common errors instead of terminating unexpectedly.
5. Understanding API Requests: GET and POST
Two common HTTP methods are GET and POST.
GET — Retrieve Information
GET requests are used to retrieve information from a server.
For example:
import requests

response = requests.get(
    "https://jsonplaceholder.typicode.com/posts",
    timeout=15
)

response.raise_for_status()

posts = response.json()

for post in posts[:5]:
    print(post["title"])
This retrieves a collection of sample posts and prints the first five titles.
POST — Submit Information
POST requests are commonly used to submit information to a server or create a resource.
Example:
import requests

url = "https://jsonplaceholder.typicode.com/posts"

new_post = {
    "title": "Python Web Automation",
    "body": "Learning how to automate web workflows.",
    "userId": 1
}

response = requests.post(
    url,
    json=new_post,
    timeout=15
)

response.raise_for_status()

print("Status:", response.status_code)
print("Response:", response.json())
JSONPlaceholder is a testing service. It simulates creating a resource but does not permanently store the submitted post.
Other common HTTP methods include:
- PUT — replace a resource.
- PATCH — update part of a resource.
- DELETE — request deletion of a resource.
Always check the API documentation before using these methods. They can modify or delete real data.
6. Extracting Website Information with BeautifulSoup
Sometimes, the information you need is available on a web page but not through an API.
This is where web scraping can be useful.
BeautifulSoup helps Python read and navigate HTML documents.
Let’s use a website designed specifically for practising web scraping:
The page contains quotations, authors, and tags.
First, retrieve the page:
import requests
from bs4 import BeautifulSoup

url = "https://quotes.toscrape.com/"

response = requests.get(url, timeout=15)

response.raise_for_status()

soup = BeautifulSoup(
    response.text,
    "html.parser"
)

print(soup.title.text)
The script retrieves the HTML content and parses it.
Extracting Quotations and Authors
Now let’s collect the quotations and their authors.
import requests
from bs4 import BeautifulSoup

url = "https://quotes.toscrape.com/"

response = requests.get(url, timeout=15)

response.raise_for_status()

soup = BeautifulSoup(
    response.text,
    "html.parser"
)

quotes = soup.select(".quote")

for item in quotes:

    quote_text = item.select_one(".text").get_text(
        strip=True
    )

    author = item.select_one(".author").get_text(
        strip=True
    )

    print("Quote:", quote_text)
    print("Author:", author)
    print("-" * 40)
Let’s understand the important parts.
BeautifulSoup()
This converts the retrieved HTML into a structure Python can navigate.
select()
This uses CSS selectors to locate matching HTML elements.
select_one()
This retrieves the first matching element.
get_text()
This extracts the readable text from an HTML element.
With these techniques, you can retrieve specific information from a permitted web page without manually copying it.
Remember that a website’s HTML structure can change. Your scraping code should be tested and maintained accordingly.
7. Automating Browser Workflows with Playwright
API requests and web scraping do not always provide everything you need.
Some websites require users to interact with buttons, menus, forms, and dynamically loaded content.
Browser automation solves this problem.
Playwright is a browser automation framework that supports Chromium, Firefox, and WebKit.
Let’s build a simple example that opens a website and retrieves its page title.
from playwright.sync_api import sync_playwright

with sync_playwright() as playwright:

    browser = playwright.chromium.launch(
        headless=True
    )

    page = browser.new_page()

    page.goto(
        "https://example.com",
        wait_until="domcontentloaded"
    )

    print("Page title:", page.title())

    browser.close()
The headless=True setting runs the browser without displaying its graphical interface.
If you want to watch the browser operate, change it to:
headless=FalseFilling Out a Web Form
Let’s take browser automation further.
The following example uses a form on the HTTPBin testing website:
https://httpbin.org/forms/post
The form contains fields for customer information.
We can use Playwright to fill in the fields and submit the form.
from playwright.sync_api import sync_playwright

with sync_playwright() as playwright:

    browser = playwright.chromium.launch(
        headless=False
    )

    page = browser.new_page()

    page.goto("https://httpbin.org/forms/post")

    page.locator(
        'input[name="custname"]'
    ).fill("Abraham")

    page.locator(
        'input[name="custtel"]'
    ).fill("0000000000")

    page.locator(
        'input[name="custemail"]'
    ).fill("example@example.com")

    page.locator(
        'textarea[name="comments"]'
    ).fill("This is a Python automation test.")

    page.locator(
        'button[type="submit"]'
    ).click()

    page.wait_for_load_state("domcontentloaded")

    print("Form submitted.")
    print("Result URL:", page.url)

    browser.close()
This is a demonstration using a test form. The telephone number and email address are placeholders.
In a real business workflow, you would retrieve the information from a trusted source, validate it, and ensure that the user has authorised its submission.
Why Playwright Is Useful
Playwright can automate tasks that require a browser, including:
- Filling out forms.
- Testing login workflows for applications you own or are authorised to test.
- Checking page content.
- Capturing screenshots.
- Testing website navigation.
- Automating repetitive administrative browser tasks.
For websites that provide APIs, use the API where possible rather than relying on browser automation for everything.
8. Building a Practical Project: Python Web Data Collector
Let’s combine what we’ve learned into a practical project.
Our goal is to create a small application that:
- Connects to a public test API.
- Retrieves a collection of posts.
- Extracts selected information.
- Saves the information into a CSV file.
- Handles connection and HTTP errors.
This project demonstrates how Python can collect online data and turn it into a report.
Step 1: Create the project
web-data-collector/
│
├── main.py
├── requirements.txt
└── output/
Install the requests library if you haven’t already:
pip install requestsStep 2: Write the code
Create main.py:
import requests
import csv
from pathlib import Path


API_URL = "https://jsonplaceholder.typicode.com/posts"

OUTPUT_DIR = Path("output")
OUTPUT_FILE = OUTPUT_DIR / "posts_report.csv"


def fetch_posts():
    """Retrieve posts from the public test API."""

    try:
        response = requests.get(
            API_URL,
            timeout=15
        )

        response.raise_for_status()

        data = response.json()

        if not isinstance(data, list):
            raise ValueError(
                "Unexpected API response format."
            )

        return data

    except requests.exceptions.Timeout:
        print("Request timed out.")

    except requests.exceptions.HTTPError as error:
        print("HTTP error:", error)

    except requests.exceptions.RequestException as error:
        print("Connection error:", error)

    except ValueError as error:
        print("Data error:", error)

    return []


def save_to_csv(posts):
    """Save retrieved posts to a CSV report."""

    if not posts:
        print("No records available to save.")
        return

    OUTPUT_DIR.mkdir(
        parents=True,
        exist_ok=True
    )

    with OUTPUT_FILE.open(
        "w",
        newline="",
        encoding="utf-8"
    ) as file:

        writer = csv.DictWriter(
            file,
            fieldnames=[
                "id",
                "userId",
                "title",
                "body"
            ]
        )

        writer.writeheader()

        for post in posts:

            writer.writerow({
                "id": post.get("id"),
                "userId": post.get("userId"),
                "title": post.get("title"),
                "body": post.get("body")
            })

    print(
        f"Successfully saved {len(posts)} records."
    )

    print(f"Report location: {OUTPUT_FILE}")


def main():

    print("Starting Python Web Data Collector...")

    posts = fetch_posts()

    if posts:
        save_to_csv(posts)

    else:
        print("Data collection could not be completed.")


if __name__ == "__main__":
    main()
Step 3: Run the project
Open your terminal inside the project directory.
Run:
python main.pyYou should see output similar to:
Starting Python Web Data Collector...
Successfully saved 100 records.
Report location: output/posts_report.csv
The exact result depends on the API response.
Open the generated CSV file using Excel or another spreadsheet application.
You should find a report containing the post ID, user ID, title, and body.
Step 4: Understand the project
Let’s examine the main functions.
fetch_posts()
This function connects to the API and retrieves the data.
It also handles common network and HTTP errors.
save_to_csv()
This function creates the output directory and saves the retrieved information in a CSV file.
main()
This function controls the workflow by calling the other functions in the correct order.
This separation makes the application easier to maintain and extend.
Step 5: Ideas for improving the project
You can extend the project by adding:
- Command-line options for selecting different API endpoints.
- Logging to record each collection run.
- Retry logic for temporary connection failures.
- Date and time information in the report.
- Duplicate record detection.
- Automatic scheduled execution.
- Email delivery of the generated report.
You could also connect the project to a business API, provided you have the necessary permission and credentials.
9. Important Security and Reliability Considerations
Web automation can interact with important systems and sensitive information. Therefore, it must be designed carefully.
Protect API Keys and Credentials
Some APIs require authentication.
Never place passwords, API keys, or access tokens directly inside code that you intend to publish.
Use environment variables or an appropriate secrets-management solution.
For example:
import os

api_key = os.getenv("MY_API_KEY")

if not api_key:
    raise RuntimeError(
        "API key is not configured."
    )
Use HTTPS
Whenever possible, communicate with web services using HTTPS.
It encrypts information transmitted between the client and server.
Set Request Timeouts
Always consider timeouts when making network requests.
Without them, a script may wait indefinitely for an unresponsive service.
Handle Rate Limits
Some APIs limit the number of requests you can make within a given period.
HTTP 429 indicates that the client has sent too many requests.
Respect the service’s rate limits and follow its documented retry instructions. Exponential backoff is a common approach for handling temporary failures.
Validate Retrieved Information
Do not assume that information returned by an API or website is always complete or correctly formatted.
Validate the fields your application depends on before processing them.
Respect Website Rules and Privacy
Before scraping or automating a website:
- Review its terms of service.
- Check its robots.txt guidance where relevant.
- Respect authentication and access controls.
- Avoid collecting personal information without a lawful basis.
- Do not overload websites with excessive requests.
- Do not attempt to bypass CAPTCHAs, paywalls, or security protections.
- Use test environments when practising browser automation.
Automation should make legitimate work easier, not undermine the security or availability of online services.
10. Real-World Applications of Web Automation
Web automation is useful across many professional environments.
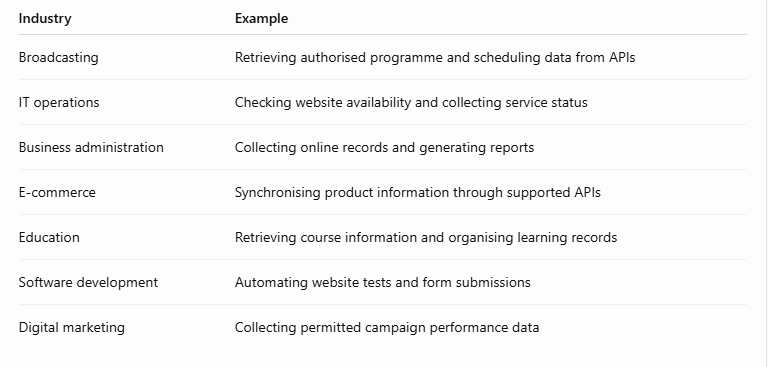
Consider a broadcasting organisation that manages several digital platforms.
A Python script could communicate with supported APIs to retrieve authorised streaming statistics, collect programme information, and generate daily reports.
Instead of manually visiting several dashboards, staff could receive a consolidated report through an automated workflow.
The important point is that automation should use supported integrations and respect the permissions of each platform.
11. Practical Challenges
It’s time to practise.
Try the following exercises to strengthen your understanding.
Challenge 1: API data collection
Modify the Web Data Collector to retrieve information from another public test API.
Extract at least three fields and save them into a CSV file.
Challenge 2: Website monitoring
Create a Python script that checks whether five websites are responding.
Record the website URL, HTTP status code, response time, and date of each check.
Challenge 3: Web scraping
Use the Quotes to Scrape practice website to collect quotations and authors.
Save the results in a CSV file.
Challenge 4: Browser automation
Use Playwright to open a test website, fill out a form, and capture a screenshot of the result.
Challenge 5: Error handling
Modify your Web Data Collector to handle HTTP 429 responses and temporary connection failures.
Add logging so you can identify when a collection run succeeds or fails.
These exercises will help you understand how to build web automation workflows that are more useful and reliable.
Conclusion: Connect Python to the Web
Web automation expands what you can accomplish with Python.
You are no longer limited to organising files or managing folders on your computer. You can connect applications, retrieve online information, submit data, and automate selected browser workflows.
The three approaches introduced in this article serve different purposes:
- APIs help applications communicate directly.
- Web scraping extracts permitted information from web pages.
- Browser automation performs interactions through a web browser.
The best automation solution is not necessarily the one that uses the most tools. It is the one that solves the problem reliably, securely, and with the least unnecessary complexity.
Start with an API. Learn how to process its response. Then explore web scraping and browser automation as your projects become more advanced.
With practice, you can turn repetitive online activities into useful Python-powered workflows.
Explore the Code on GitHub
You can find the practical projects and follow the complete Wednesday series here:
Python Automation 2026 — Official GitHub Repository
What’s Next?
In Part 4, we’ll explore Automating Emails, Reports, and Business Documents with Python.
We’ll learn how Python can help generate documents, prepare reports, automate email workflows, and reduce repetitive administrative tasks.
If you’ve been following the series, keep practising and share your progress.
Learn. Build. Automate.
Related articles
Python Automation 2026 — Part 2: Automating Files, Folders, and Everyday Tasks with Python
Part 2 of Python Automation 2026 — From Scripts to Intelligent Workflows Imagine starting your working day and discovering that your computer has already…
Read article
Why Is Building a New Web Browser Almost Impossible?
The hidden engineering, enormous costs, security challenges, and technical barriers behind the software we use every day. Every day, billions of people open a…
Read article
Python Automation in 2026: From Simple Scripts to Real-World Workflows – Part 1
Part 1 of Python Automation 2026 — From Scripts to Intelligent Workflows Imagine arriving at work on Monday morning and discovering that hundreds of…
Read article← Understanding the Linux File System: A Beginner’s Guide to Linux Directories
15 Essential Linux Commands Every Beginner Should Know →
Leave a comment